How to Create a Company File in QuickBooks.
New to QuickBooks?
This section is just for you. I’m going to show you how to create your company file, which is the file you’ll use each time you use QuickBooks. Creating company file
QuickBooks walks you through a setup process that will create your company file for you.
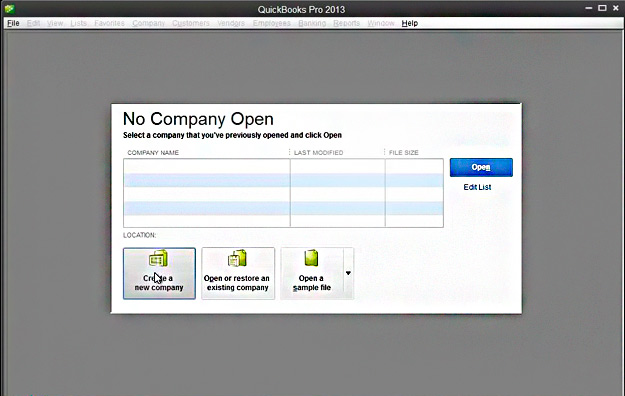
1 Open QuickBooks. You’ll see the No Company Open window.
2 Click Get Started.
3 On the Create New Company, enter information about your company and click Next.
o Company Name — What you call your company.
o Legal Name — Your company name as it appears on legal documents.
o Address/Country — The address for your company as you want it to appear on
invoices, checks, and other forms. You can also enter different addresses for
Shipping and Billing.
o Company Start Date — The date you want to use to start tracking your business
transactions in QuickBooks. Usually this is the first day of your current fiscal year.
QuickBooks for Mac 2013 User’s Guide 7
Although you can change your start date later, it’s best to decide on the best start
date now.
o Income Tax Form Used — Which tax form do you use for your business's taxes? If
you're not sure, check with your accountant.
o Federal ID — The ID you use on your company's federals taxes.
4 Next you’ll see the “Choose your industry and chart of accounts” window. Select the
type of business that comes closest to describing your company. QuickBooks creates
all the accounts that have a check mark. This is our best guess for the accounts we
think you’ll need based on the type of industry you’re in. You can make changes if you
like. If you make changes and want to go back to QuickBooks suggested accounts,
click Default.
Expert Settings
You may need to set some non-standard options while creating your company file.
You'll probably only need these if your accountant has given you specific instructions.
Click Finish when you’re done.
o Summary Reports Basis — In QuickBooks, an accrual basis report shows income
regardless of whether all your customers have paid up, and expenses regardless of
whether you have paid all your bills. A cash-basis report shows income only if you
have received it, and expenses only if you have paid them. You can change this
later with Reporting preferences.
o First month in tax year — If your company's tax year starts in a month other than
January, select that month.
o First month in fiscal year — If your company's fiscal year starts in a month other
than January, select that month.
o Customers are charged sales tax — Select if you are charging your customers sales
tax. Then create your sales tax items. You can change your sales tax items later on
the Items list
o Inventory and purchase orders are used — Select this option if you want to create
inventory part items, write purchase orders, and create inventory-related reports.
You can change this later with Inventory preferences.
o Customer and/or job estimates are prepared — Turn the estimating feature on.
When estimating is on, QuickBooks adds a Create Estimates command to the
Customers menu, and an Estimate button to the Customer:Job list. You can change
this later with Inventory preferences.
o Keep track of time — Turns on time tracking in your company file. Track your time
and/or your employee's time by entering hours worked on weekly timesheets or
single activity entry forms (you can use the two forms interchangeably). You can
change this later with Time Tracking preferences.
5 On the final window, you’ll see the location on your new company file. Click OK.
Got a QuickBooks mess? Call the QuickBooks Gal today at 775-348-9225!
This section is just for you. I’m going to show you how to create your company file, which is the file you’ll use each time you use QuickBooks. Creating company file
QuickBooks walks you through a setup process that will create your company file for you.
1 Open QuickBooks. You’ll see the No Company Open window.
2 Click Get Started.
3 On the Create New Company, enter information about your company and click Next.
o Company Name — What you call your company.
o Legal Name — Your company name as it appears on legal documents.
o Address/Country — The address for your company as you want it to appear on
invoices, checks, and other forms. You can also enter different addresses for
Shipping and Billing.
o Company Start Date — The date you want to use to start tracking your business
transactions in QuickBooks. Usually this is the first day of your current fiscal year.
QuickBooks for Mac 2013 User’s Guide 7
Although you can change your start date later, it’s best to decide on the best start
date now.
o Income Tax Form Used — Which tax form do you use for your business's taxes? If
you're not sure, check with your accountant.
o Federal ID — The ID you use on your company's federals taxes.
4 Next you’ll see the “Choose your industry and chart of accounts” window. Select the
type of business that comes closest to describing your company. QuickBooks creates
all the accounts that have a check mark. This is our best guess for the accounts we
think you’ll need based on the type of industry you’re in. You can make changes if you
like. If you make changes and want to go back to QuickBooks suggested accounts,
click Default.
Expert Settings
You may need to set some non-standard options while creating your company file.
You'll probably only need these if your accountant has given you specific instructions.
Click Finish when you’re done.
o Summary Reports Basis — In QuickBooks, an accrual basis report shows income
regardless of whether all your customers have paid up, and expenses regardless of
whether you have paid all your bills. A cash-basis report shows income only if you
have received it, and expenses only if you have paid them. You can change this
later with Reporting preferences.
o First month in tax year — If your company's tax year starts in a month other than
January, select that month.
o First month in fiscal year — If your company's fiscal year starts in a month other
than January, select that month.
o Customers are charged sales tax — Select if you are charging your customers sales
tax. Then create your sales tax items. You can change your sales tax items later on
the Items list
o Inventory and purchase orders are used — Select this option if you want to create
inventory part items, write purchase orders, and create inventory-related reports.
You can change this later with Inventory preferences.
o Customer and/or job estimates are prepared — Turn the estimating feature on.
When estimating is on, QuickBooks adds a Create Estimates command to the
Customers menu, and an Estimate button to the Customer:Job list. You can change
this later with Inventory preferences.
o Keep track of time — Turns on time tracking in your company file. Track your time
and/or your employee's time by entering hours worked on weekly timesheets or
single activity entry forms (you can use the two forms interchangeably). You can
change this later with Time Tracking preferences.
5 On the final window, you’ll see the location on your new company file. Click OK.
Got a QuickBooks mess? Call the QuickBooks Gal today at 775-348-9225!


Comments
Post a Comment